Hello everyone.
Wow , what a week!
We've had sports days , netball matches, school plays, leavers assemblies, gifts for teachers, lockers to clear , school trips and my 42nd birthday. My youngest has just completed his junior school, so it's new school uniform and excitement about senior school. It's also been the soggiest week of July ever known!
Being a mum is such a scramble but it's such fun. You all arrive in a breathless heap on the floor on the first day of the holidays but it soon turns into games and painting, friends and playing. I love having them back in the holidays, during term time every thing is so rushed. They grow up so fast and we want to enjoy every minute. (Until they argue and then all bets are off!)
So here we go. My kids made "me trees" or "me flowers" at nursery school and loved them. It's a combination of self portraits and body prints to make a plant. The stalk is simply a piece of string measured to the child's height. Kids love having their height measured and comparing it with each other or you. There always seems to be a competition to be the tallest.
It will be a bit messy so I suggest you pop down some old news papers or a paint proof cloth before you begin. Have that bowl of warm washing up water standing by and start early enough to get all cleaned up before tea time is due. Never let children near paint when they're tired or hungry....it doubles the cleaning up!
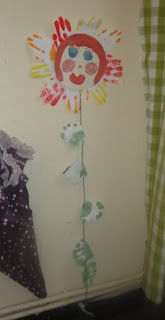
This is what we're aiming for....

You will need....

String for the stalk and an extra bit to hang the plant up with.
Paper.
Paints in a range of colours.
Paint brush and water pot.
Supervised scissors.
Paper plate or a large flat, washable plate/tray.
Plain card from a cereal box.....we used a cheerio box this week!
Sticky tape.
Hands and feet.
Here's what to do....
1. Cut a circle from the cereal packet. It's easiest to draw round a small plate. This will be the face.
2. Paint your own face on the circle and leave it to dry. This is a good chance to chat about all the different features on a face. Use a mirror. I have freckles to they've been painted on too.
3. Mix up some brightly coloured paint on the paper plate or a washable dish. Dip in hands and make hand prints on the plain paper. These will be the petals an the flower. Make lots, we did 9. Leave to dry.

4. Mix some green or brown paint and do the same with footprints. These will be the leaves. Yep, this is the messy bit. Have that warm water standing by! Leave to dry. The point of the paper plate is to throw it away afterwards and reduce the cleaning up.
5. Cut the piece of string to the same height as your child. Measuring is always fun.
6. Sticky tape the end of the string onto the back of the dry face.
7. Stick the hand prints to the back of the face. Do this round the face so that when you look at the front, the petals frame the face.
8. Use sticky tape to fasten the foot leaves to the string. Spread them out to look like a beanstalk.
9. Finally, hang the flower up at the same height as your child. In a row if you have several, and admire!

Wow , what a week!
We've had sports days , netball matches, school plays, leavers assemblies, gifts for teachers, lockers to clear , school trips and my 42nd birthday. My youngest has just completed his junior school, so it's new school uniform and excitement about senior school. It's also been the soggiest week of July ever known!
Being a mum is such a scramble but it's such fun. You all arrive in a breathless heap on the floor on the first day of the holidays but it soon turns into games and painting, friends and playing. I love having them back in the holidays, during term time every thing is so rushed. They grow up so fast and we want to enjoy every minute. (Until they argue and then all bets are off!)
So here we go. My kids made "me trees" or "me flowers" at nursery school and loved them. It's a combination of self portraits and body prints to make a plant. The stalk is simply a piece of string measured to the child's height. Kids love having their height measured and comparing it with each other or you. There always seems to be a competition to be the tallest.
It will be a bit messy so I suggest you pop down some old news papers or a paint proof cloth before you begin. Have that bowl of warm washing up water standing by and start early enough to get all cleaned up before tea time is due. Never let children near paint when they're tired or hungry....it doubles the cleaning up!
This is what we're aiming for....

You will need....

String for the stalk and an extra bit to hang the plant up with.
Paper.
Paints in a range of colours.
Paint brush and water pot.
Supervised scissors.
Paper plate or a large flat, washable plate/tray.
Plain card from a cereal box.....we used a cheerio box this week!
Sticky tape.
Hands and feet.
Here's what to do....
1. Cut a circle from the cereal packet. It's easiest to draw round a small plate. This will be the face.
2. Paint your own face on the circle and leave it to dry. This is a good chance to chat about all the different features on a face. Use a mirror. I have freckles to they've been painted on too.
3. Mix up some brightly coloured paint on the paper plate or a washable dish. Dip in hands and make hand prints on the plain paper. These will be the petals an the flower. Make lots, we did 9. Leave to dry.

4. Mix some green or brown paint and do the same with footprints. These will be the leaves. Yep, this is the messy bit. Have that warm water standing by! Leave to dry. The point of the paper plate is to throw it away afterwards and reduce the cleaning up.
5. Cut the piece of string to the same height as your child. Measuring is always fun.
6. Sticky tape the end of the string onto the back of the dry face.
7. Stick the hand prints to the back of the face. Do this round the face so that when you look at the front, the petals frame the face.
8. Use sticky tape to fasten the foot leaves to the string. Spread them out to look like a beanstalk.
9. Finally, hang the flower up at the same height as your child. In a row if you have several, and admire!


All's done and well done!
There we are then. In our house Daddy is the tallest and it's fun measuring his height by standing on stools and chairs. Believe it or not .... this is very early practical maths, so encourage your little ones to go round the house measuring everything. Measure with string or play bricks, even lego.
Have a contest to find the tallest teddy!
Something less painty next week!
See you soon
Heli x
1 comment:
I have seen this one on the wall in Heli's house and it is just great. Make sure if you fix it on the wall it's stuck with something you can peel off in case the paint comes off when you take it down later! Well done, Heli
Post a Comment