Here we are.... Week 2 !
Hello to everyone who has logged on around the world...Germany, Taiwan, Britain and the States so far.
I hope you and your little ones are ready for something a little bit messier this week.
Paint !
Don't panic....it's not too messy but I would suggest having a bowl or sink full of warm water and a hand towel standing by before you start. I learnt this the hard way. Children nearly always wait to get truly painty until the point when we've got our hands full with their wet painting, their teddy that wants to see the painting and their brother or sister who tried to eat the painting. Have the hand washing water ready first, trust me. Actually, the more you can get ready in advance the better. It's so much easier to pop a few things together when they're asleep or watching cartoons. (You'll feel much more on top of things.)
Todays message...Messiness is good , but so is soap and water !
Here we go then. This week we are going to make a picture of a garden with nearly 3-d plants and bugs. Why not take the children for a walk in the park or around your garden first to look at the plants and bugs in real life. (Watch out for the ones that bite or sting !) Once again this is a cheapy creation. I have used children's paint which we already had at home but if you don't have any you could use pencils, crayons or scraps of coloured paper instead.
This is what we're aiming for....

Here's what you will need....
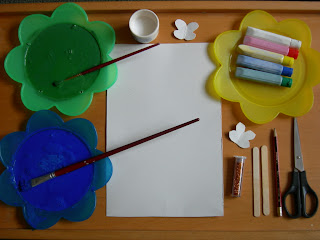
One cardboard box, mine had cornflakes in it.
Pencil
Lollipop sticks
Supervised scissors
Children's glue
Washable paint, green, blue and any other spare colours. (Avoid black unless you supervise it carefully or pictures can be spoilt very easily.)
Paint brushes, large ends are better for this.
Optional glitter.
Here's how to do it....
1. Cut up the cereal box . You need the two large sides of the box to paint on and the remaining scraps for making flowers and bugs. The inside of cereal packets are great for kids paintings because they are stronger than paper when wet.

2. Paint one cardboard sheet blue for sky. All over. Leave to dry. (Use the inside surface not the printed side)
3. On the other sheet make green hand prints. This will be the grass. If your child is nervous of putting their hand into green gooey paint (and what sensible person wouldn't be) then they can paint their hand green with the brush to make the hand prints. Leave to dry.

4. On the left over scraps, paint bugs, beetles and flowers. Leave to dry, then cut out. (If a grown up curls the edges slightly before drying they will be more 3-dimensional.)
5. Cut out the green grass hand prints. Supervise the scissors.
6. Using the glue, stick the grass at the bottom of the blue sky. It can overlap.
7. Stick 2 or more bugs onto the end of lollipop sticks. To make puppets.
8. Stick the rest of the bugs and flowers onto the grass and sky.
9. Use a little glitter on the wet paint to add that special sparkle.
10. Display proudly, perhaps with a pot of lollipop flowers either side !

My big children have loved doing this again. They make much more detailed bugs now but still love the hand painting. It's a great activity to do if you have a mixture of younger and older children.
The only thing you may have to buy is paint. Everything else is lying around around at home. If you do buy paint, just get cheap and cheerful washable poster paint. Don't bother with black but white is very handy when you want to start mixing colours.
Top tip... if you add a dash of water and a tiny squirt of washing up liquid when you stir up the paint, it goes a lot further and is much more washable afterwards.
Do send me your pictures and comments. I'll try to get my head around the technology to make a gallery.
Happy painting ! Tune in again for another arty idea. Next time... dough bugs !
Hello to everyone who has logged on around the world...Germany, Taiwan, Britain and the States so far.
I hope you and your little ones are ready for something a little bit messier this week.
Paint !
Don't panic....it's not too messy but I would suggest having a bowl or sink full of warm water and a hand towel standing by before you start. I learnt this the hard way. Children nearly always wait to get truly painty until the point when we've got our hands full with their wet painting, their teddy that wants to see the painting and their brother or sister who tried to eat the painting. Have the hand washing water ready first, trust me. Actually, the more you can get ready in advance the better. It's so much easier to pop a few things together when they're asleep or watching cartoons. (You'll feel much more on top of things.)
Todays message...Messiness is good , but so is soap and water !
Here we go then. This week we are going to make a picture of a garden with nearly 3-d plants and bugs. Why not take the children for a walk in the park or around your garden first to look at the plants and bugs in real life. (Watch out for the ones that bite or sting !) Once again this is a cheapy creation. I have used children's paint which we already had at home but if you don't have any you could use pencils, crayons or scraps of coloured paper instead.

Here's what you will need....

One cardboard box, mine had cornflakes in it.
Pencil
Lollipop sticks
Supervised scissors
Children's glue
Washable paint, green, blue and any other spare colours. (Avoid black unless you supervise it carefully or pictures can be spoilt very easily.)
Paint brushes, large ends are better for this.
Optional glitter.
Here's how to do it....
1. Cut up the cereal box . You need the two large sides of the box to paint on and the remaining scraps for making flowers and bugs. The inside of cereal packets are great for kids paintings because they are stronger than paper when wet.

2. Paint one cardboard sheet blue for sky. All over. Leave to dry. (Use the inside surface not the printed side)
3. On the other sheet make green hand prints. This will be the grass. If your child is nervous of putting their hand into green gooey paint (and what sensible person wouldn't be) then they can paint their hand green with the brush to make the hand prints. Leave to dry.

4. On the left over scraps, paint bugs, beetles and flowers. Leave to dry, then cut out. (If a grown up curls the edges slightly before drying they will be more 3-dimensional.)
5. Cut out the green grass hand prints. Supervise the scissors.
6. Using the glue, stick the grass at the bottom of the blue sky. It can overlap.
7. Stick 2 or more bugs onto the end of lollipop sticks. To make puppets.
8. Stick the rest of the bugs and flowers onto the grass and sky.
9. Use a little glitter on the wet paint to add that special sparkle.
10. Display proudly, perhaps with a pot of lollipop flowers either side !

All done and well done !
The bug puppets can then pop in and out of the grass or flutter across the sky.
My big children have loved doing this again. They make much more detailed bugs now but still love the hand painting. It's a great activity to do if you have a mixture of younger and older children.
The only thing you may have to buy is paint. Everything else is lying around around at home. If you do buy paint, just get cheap and cheerful washable poster paint. Don't bother with black but white is very handy when you want to start mixing colours.
Top tip... if you add a dash of water and a tiny squirt of washing up liquid when you stir up the paint, it goes a lot further and is much more washable afterwards.
Do send me your pictures and comments. I'll try to get my head around the technology to make a gallery.
Happy painting ! Tune in again for another arty idea. Next time... dough bugs !
See you next week,
Heli x
Heli x